Thursday, August 30, 2012

Make your own coffee packs


When our son was born, Hubs and I were overwhelmed with "new parent forgetfulness." I had countless moments where I stood in the shower trying to remember if I shampooed my hair already. Or trying to remember how many scoops of coffee I just put in the filter. It was comforting to know that most new parents experienced this same phenomenon. So Hubs and I were tasked with ways to help us remember things. Like putting the shampoo on the shower floor after using it to help us remember or making up pre-filled coffee packs. The forgetfulness has slowly ebbed now that our son has reached toddlerhood, but the tricks we use have still stuck around. So, here is how we solved the coffee crisis during the forgetful time. And don't forget to read the special trick I have included. It's pretty awesome!


We use a traditional carafe coffee maker with a standard basket and standard filters.

You will need:

Coffee

Scoop

Filters

Kitchen string (or any white cotton string)


I pre-cut my strings for the amount of coffee packs I want to make.


Lay the string out horizontally and place the filter on top of the string.


Scoop out your desired amount of coffee.


We only use the coffee packs for when we make 8 cups of coffee. I've tried 10 cups and the packs are too full to tie. We a scoop that came with the coffee maker. It measures just a bit more than a tablespoon. For 8 cups we use three rounded scoops.


I know filters are round, but let’s pretend its square. Fold the filter over on one side to the center, then fold the top and bottom to the center.


Fold the last side over. Using an over hand knot (what you use when tying your shoes) to tie up the pack.


****SPECIAL TRICK****

Go around the string an extra time before tying your bow. This makes the knot hold tight should the bow come undone. As you can see, the knot stays without holding the string! This trick works wonders on shoelaces, especially for kids, and when wrapping gifts so you don't have to hold your finger over the knot so it doesn't slip while you tie the bow.

When you put the pack in the filter basket place it bow side up.


I put a filter inside the coffee canister to hold the packs do they don't pick up coffee grounds on the bottom.


And there you have it. Ready to go, no counting scoops required, sleep deprivation friendly coffee packs!!!

God Bless!

 
Pin It

Sunday, August 26, 2012

Rotating tasks


Some people prefer to wait for a "spring cleaning" to get to those rarely cleaned areas. But if you establish a list of monthly rotating tasks you won't have so much to do in one bulk clean. My previous cleaning post was about establishing a rhythm. Once you get a rhythm down then you will be able to start rotating tasks. Here is a sample of how to rotate tasks for a month/year. If a similar area of your house sees more use or gets dirtier, then you will clean it more often.


Daily/every other day
Tidy rooms
empty garbage cans
Laundry
Dishes
Make beds


Every week:  in addition to daily tasks
Dusting furniture and nick knacks
Vacuuming/ sweeping/ mopping high traffic areas like dens, entry ways, bathrooms, kitchen and daily dining areas
Bathrooms that are used on daily basis
Change sheets on beds that are used daily.
Wiping down counters
Cleaning kitchen sink


Week 1: in addition to every week tasks

Dusting Ceiling fans/light fixtures; Blinds/window sills; Lampshades
Check batteries in smoke detectors/CO2 detectors (I know it's not cleaning but while you are looking up high you might as well check)


Week 2: in addition to every week tasks

High area and low area dusting (looking for cobwebs in corners and getting those baseboards)
Window and door framings (around the molding if you have it)
Clean Guest areas like rooms, bathrooms and formal dining areas
Clean microwave (can be done weekly if needed)


Week 3: in addition to every week tasks

Repeat week 1
Clean refrigerator thoroughly inside (including top) this is a good chance to check expiration dates of foods
wipe down cabinet fronts in bathrooms and kitchen
Wipe down exposed sides of appliances (washer/dryer/dishwasher etc)
Wipe down door fronts and light switches.


Week 4: in addition to every week tasks
Repeat week 2
Skip guest areas if not used since last clean if you want. Check for dust/cobwebs though.
Wash comforters/quilts/ rugs that are washable. (can be rotated to every other month)
Change return air vent filter (if have one; most units will suggest monthly changing of filters)


Every other month tasks:
(I call them odd-even tasks. Some done on even months others on odd months)

Odd:
Moving furniture to vacuumed/sweep/ mop under that you don't get to during weekly/monthly cleaning.
Defrosting chest or upright freezer (good chance to take inventory of your stash and throw away expired foods)


Even:
Using vacuum attachments to get along all edges of carpeted rooms/stairs
Clean windows.
Clean garbage cans (can be done monthly)
Organizing food pantry


Every 6 months:
(usually done based on the season; for example you may not want to clean the oven in mid summer or shampoo carpeting mid winter)

Cleaning oven
Shampooing carpets/furniture
Cleaning out closets and "weeding" unused items.
Flipping/rotating mattresses
Cleaning vacuum cleaner (if you have a higher end one with a warranty check it first because the manufacture may void a warranty if not cleaned by a professional) this can also be done odd/even months


Yearly tasks:
Cleaning out and organize attics/garages/storage rooms


I know it seems overwhelming and I bet you are thinking : how do I keep up with all that?! Get a pocket sized yearly calendar. Print a list of the tasks you want done daily, weekly, monthly, etc and keep it with the calendar. Give each list a color or number and on your calendar mark the name/color on the day/week you want it done. If something doesn't get done that week/day you can make a note and add it to the next day's or week's list.


Hope this helps with organizing your cleaning tasks!


God Bless!

Pin It

Saturday, August 25, 2012

Mickey Mouse Clubhouse Party


Before I started my blog I had posted a couple of pictures of handmade decorations I made for my sons Mickey Mouse Clubhouse themed Birthday party. So I thought I would create a post including those items and a few more so pinners could have a reference as to how I made them.

I purchased many items from our local Party City. I had every intention on printing and making almost every single decoration but before I knew it time ran out and I only had time to make a few things and bought the rest. I used a lot of ideas from Pinterest and added my own spin to them.

I found Mickey themed goody bags on Pinterest and decided to make my own.
(Original link http://www.etsy.com/listing/75713764/mickey-mouse-goody-bags-mickey-mouse?ref=v1_other_2)

 
Using my Cricuit and the Disney Mickey and Friends cartridge, I cut out Mickey ear silhouettes, Mickey’s pants, and Mickey’s shoes. I used glue dots and affixed them to the paper goody bags. I used a sharpie marker and outlined the pants and shoes because they just seemed too plain without it.
 

I made a paper piecing of Goofy’s hat and cut out Goofy’s name using the Cricuit and made a sign for the Goofy punch (Its not shown in this picture but I used equal parts of the green Hawaiian punch and 7up)
 
I also found this adorable pin on Pinterest

I originally planned on just printing a sign that said “Handy Helpers,” and using a plastic carrier but my mom came up with a brilliant idea to cover a Starbucks Frappuccino carrier. So we ran with the idea and it turned out perfect. I again cut a Mickey ear silhouette and two Mickey hands. The hands were actually from a “border” setting. So I carefully cut two hands off the border and flipped one over to get a right and left hand. I purchased a Mickey Mouse 12x12 scrapbook paper packet at Hobby Lobby and used one 12x12 sheet cut in half to wrap the carrier. I cut the top and bottom border off another piece of 12x12 paper and wrapped the pieces around the carrier. After the party was over I took the ears and hands off the carrier (they got a little party food on them) and use it now in my son’s room as an organizer.
 
 
From Party City I purchased a Mickey Mouse Clubhouse center piece kit. After the party was over I saved them and they now are hung on my son’s bedroom wall and Mickey’s cut out stands on its own. I plan on matting the wall hangings to make them look just a bit better.


I also purchased a memory matching game. I had no intentions of using it for the game. Another idea came to me instead.
www.partycity.com


I used them as wall décor at the party and now they hang in the same pattern in my son’s room. My future plans are to buy frames to put them in. 

I purchased some hanging decorations that, again, are now used as room décor.
www.partycity.com

 
I will most likely leave these as they are.
 

The cake was made by Publix and was super delicious.

 
I saved the cake decorations and used them as room décor.
 
I found this idea again on Pinterest for “Club”house sandwiches.

I don’t have a picture of mine (I can’t believe I forgot to photograph them!!) I purchased the sandwich cutter from Amazon.com.
****** I will recommend that you don’t cut out the bread for the sandwiches until just before you serve them. The bread dries out very fast (and save the edges of the bread and make your own croutons or breadcrumbs!) We pre-assembled our sandwiches so we could control the amounts of meat/cheese that went on each and to keep down on the ick-factor of having everyone touch all the meat/cheese at once just to get a slice for their sandwich. I used party toothpicks to hold the sandwiches together and put the veggies to the side. ************
I had left over Mickey Ears and spruced up a wall mounted coat hanger. And I even saved an extra party hat to display in the room.
 
Hot Dog! I think that about covers it.
God Bless Y'all!

Pin It

Tortilla Pizzas


Today’s post is brought to you by the number 2 (as in two hungry tummies) and the letters A and H (as in Ah Ha!)

So today I whipped up a pizza that Hubs and I had never eaten before. It’s not a recipe from Pinterest, or the Internet. I was just having one of those “let’s see what we have on hand and throw it together” moments. Now, I am positive there are recipes out there for exactly what I made but for the time being I am going to bask in my “ah ha!” moment for just a little bit.


Here is what I had on hand:

Flour tortilla shells
Olive Oil
Mozzarella cheese
Pepperoni
1/2 green bell pepper (left over from Thursday’s meatloaf)

 
Now, Hubs and I are not fond of pizzas made with the traditional tomato based sauce. Since we have *cough cough* gotten older, our stomachs just don’t handle tomato sauces well any more. But if you prefer it you can skip the olive oil stage and add pizza sauce. I don’t know how it may change the cooking time so just wing it.
 

I preheated the oven to 375

I sprayed a baking sheet with cooking spray

I laid out the tortillas on the tray and generously brushed them with the olive oil on one side. Then sprinkled a little Italian seasoning on top for an extra punch of flavor (this is optional)

I spread a generous amount of cheese on each oiled tortilla. I think I put a bit much because I had forgotten that the cheese would spread. But as Hubs said “You can never have too much cheese!”

Then I began cutting the bell pepper. It occurred to me that the peppers won’t have much time to soften because of how thin the tortilla shells are and how fast the cheese will melt. So I just microwaved two cups of water for 3 minutes and then put the peppers in the water while the oven finished pre-heating; then drained them and dried them a little with a paper towel.

Once the peppers were softened a little I put them on the pizza and put some pepperonis on top. Hubs added some jalapeño peppers to his pizza and I added just a little dash of bacon bits to one.

The topping possibilities are endless really. Just remember to take in consideration that the pizzas won’t take long to cook so you may need to “pre-cook” thicker toppings like raw veggies or warm up frozen toppings with a little boiling water.

The pizzas took only about 6 minutes to get the cheese nice and melted and the edges slightly brown. If you want a crispier crust try letting them go a bit longer. If you use a large tortilla then they might take a little longer to bake.

 
The pizzas tasted so incredibly wonderful. They were light and crispy and so flavorful. I honestly could not tell that I was eating a flour tortilla. It tasted like it was pizza dough. I don’t think we will ever go back to regular old pizza again!  


I also had a small loaf of Italian bread to serve with our pizzas. And that gave us an opening to try out a copy-cat dipping oil recipe I had found on Pinterest. Carrabba’s dipping oil. Here is a link to the recipe.


****And on a side note, Hubs and I are so proud of ourselves for using up what we have on hand! We are trying to make a switch to once a month shopping so we are using up our “food stash” we have on hand first so we can make a fresh start and keep better track of where our dollars are spent. I am sure to have future posts about our progress.

 
 God Bless!


Pin It

Thursday, August 23, 2012

Pinterest Lip gloss catastrophe


I took a test in college once that had the most random questions on it (What color is the sky? Are you taking a test: True or false?) There were about 30 or so questions. At the top of the test were the instructions. Write your name in the corner, read all questions before answering and raise your hand when finished. I've always been one to read questions before answering anyway. I got to the fourth (or so) to last question before making any answers and read "If you followed the directions and read questions before answering then skip to the last question" The last question said "Congratulations you made a perfect score for following directions; raise your hand." You get where I am going with this…. The purpose of the test was to see if we could follow directions. Well I must have since forgotten how to follow directions and I am seriously suffering for it. But I thought I would share my shortcoming just to give myself and everyone a good laugh.

Well, on Pinterest there was a post about making your own lip gloss out of Crystal Light packets and Vaseline. So I thought, hey I can do this!


I have some, *cough cough* old Wal-Mart brand Crystal Light type drink mix that never was used. It's the 2 quart kind, not the individual packets (MISTAKE # 1)

It is strawberry flavored and is red (MISTAKE # 2)

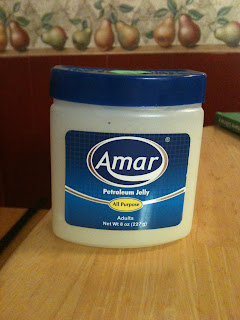
Trying to be "cost efficient" I went to the dollar mart and got cheap petroleum jelly (MISTAKE # 3)


So, I dump just a little of the drink mix in a bowl and daub some "Vaseline" in it and mix it together. Then I test a little bit of it on my lips (MISTAKE # 4 but also a good thing because I would have seriously have zero friends left if I gave this to them as a gift)


It was so NASTY!! And grainy!! And my lips are BRIGHT, BRIGHT, BRIGHT red from the granules. I am talking Bozo the Clown red!  And the granules would not "absorb" into the Petroleum jelly no matter how much I mixed.


So, I decide to use proper Vaseline and the powder and mix it. Still very grainy...
 
 
So here is where things went horribly and stupidly and even more horribly wrong.......I decided to mix in a teeny, super tiny drop of water (MISTAKE # 5,6,7,8,9 and 10)


Oh the stupidity! Oh the embarrassment!! I knew better! Obviously, no matter how hard you mix, Vaseline and water don't mesh. I don’t know what possessed me.
 

And stirring it made a HUGE mess because the water (which at this point mixed ONLY with the remaining drink mix granules) splashed in resistance against the Vaseline. Of course, it got all over my hands.....and surprise surprise... They are now dyed BRIGHT red.


This picture doesn't do the actual color justice.

Had I actually read the directions I would have found out that I should have used the individual Crystal light packets as pictured and that the granules don't go away. And I would have seen in the comments that the people who did make it as the directions said still had the same experience with the powder staining their fingers and lips. Sure, a pale pink dye would be ok on my lips but I look like a hooker here people! Oh, and I should add..I wasn’t precise when applying the gloss, so it looks like my toddler tried to put it on me.


I don't know if I should just hang my head in shame or laugh hysterically about it.

 
Needless to say, I will be exploring other options on making my own flavored lip gloss.


Oh and on a cute note, my toddler noticed my bright red hands and lips and says "ew! Mess!"


Pin It

Saturday, August 11, 2012

Perfectly folded fitted sheets


At one point in time if you took a sneak peek into my linen closet you would have found the following: neatly folded pillow cases, properly folded flat sheets and wadded up balls of fabric that possibly could be fitted sheets.

I had a horrible time getting my fitted sheets to look nice and neat like they were when I first pulled them out of the package. Wanting to remedy this situation I asked the one person who I knew had the answer: my mom. Now that I know the trick, my fitted sheets fold so nice that I often grab a fitted sheet thinking it is a flat sheet.

So, here is mom’s how to on folding fitted sheets. I use my bed as a work surface because I am too short to stand and do all the “moves.” Forgive me if you find the explanations difficult to decipher. This is actually very simple to DO, but kind of hard to explain through written directions. I included photos of each step to help out.

Lay out your sheet on your surface with the sleep side down:

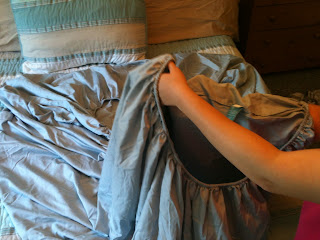
 Find the point of the seam that creates the pocket that wraps around the corner of your mattress. Grab it with your fingers and fold the sheet over so you can see the inside

Keeping your hand inside the pocket place this portion of the sheet into the pocket of one corner closest to it and match up the points of the seam.


Lay that side down and do the same to the other two corners/pockets. Now you should have a sheet that looks like this:

Now, this part is tricky to explain so bear with me…take one side of pockets and put it into the other side’s pockets. You will need to actually flip the one side “inside out” like you did in the first step to match the corners.
It should look like this:


Match up the elastic corners and lay your sheet back on the surface and “square” your edges. Fold the “smooth” edge to the center.


Then fold the top portion down:

Fold sheet in half
Then in half again
And VOILA! Beautifully folded fitted sheet!
This works with King, Queen and Full size sheets. You can do this on Twin and Crib sheets as well, but for me I skip the step where I put all corners into one pocket.
Hope this how-to helps!
God Bless!

Pin It